

 Creating a CKEditor Plugin in 20 Lines of Code
The aim of this tutorial is to demonstrate how to create a most basic CKEditor plugin.
# Developing a Custom Plugin
Learn by coding! We are going to develop a timestamp plugin that inserts current date and time into the editing area of CKEditor at the caret position. The timestamp will be added after the user clicks a dedicated toolbar button.
Since the plugin implementation makes use of the CKEDITOR.editor.insertHtml function, this
example can be easily adjusted to insert any other HTML element.
The plugin will be code-named timestamp and according to CKEditor naming conventions,
this name will also be given to the plugin folder.
# Plugin Files
Firstly, we will need to create the timestamp folder inside the plugins directory
of the CKEditor installation.
Remember that for CKEditor the name of the plugin folder is important and has to be the same as the name of the plugin, otherwise the editor will not be able to recognize it.
Inside the newly created timestamp folder we are going to place the plugin.js file
that will contain the plugin logic. Apart from that, since we will also need a
toolbar icon for our plugin, we are going to add the icons folder and subsequently
place the timestamp.png file inside.
To sum up, we will need the following file structure for our plugin to work:
ckeditor root/plugins/timestamp/icons/timestamp.png
plugin.js
# Plugin Source Code
With the following structure ready, it is time to open the plugin.js file in a
text editor and to start creating the source code of the plugin.
CKEDITOR.plugins.add( 'timestamp', {
    icons: 'timestamp',
    init: function( editor ) {
        //Plugin logic goes here.
    }
});
All CKEditor plugins are created by using the CKEDITOR.plugins.add method. This
method should contain the plugin name — 'timestamp' — and the plugin logic placed
inside the init function that is called
upon the initialization of the editor instance.
Additionally, since we are going to define a toolbar button, the icons property is set, including the name of the icon file (important: matching the button name, in lowercase).
# Creating an Editor Command
It is customary for CKEditor plugins to define an editor command that performs an
action associated with them. The command should be defined inside the init function
in order to be created upon the initialization of a CKEditor instance.
In this case we are going to use the CKEDITOR.editor.addCommand
method to define the insertTimestamp command that will insert the current date and time into CKEditor:
editor.addCommand( 'insertTimestamp', {
    exec: function( editor ) {
        var now = new Date();
        editor.insertHtml( 'The current date and time is: <em>' + now.toString() + '</em>' );
    }
});
The exec method defines a function that
will be fired when the insertTimestamp command is executed.
The most important part of the plugin functionality is to insert the HTML code into the document. To do this,
we will use the editor.insertHtml method. This method
can be used to insert arbitrary HTML code into the document, so with a bit of tweaking
you can customize the timestamp plugin code to add other HTML elements into the
CKEditor editing area.
# Creating the Toolbar Button
The simplified timestamp plugin should work through a toolbar button. To this end,
inside the init function we need to define a button that will be associated with
the insertTimestamp command:
editor.ui.addButton( 'Timestamp', {
    label: 'Insert Timestamp',
    command: 'insertTimestamp',
    toolbar: 'insert'
});
The CKEDITOR.ui.addButton method call above created a button named 'Timestamp' with the following properties:
label– the textual part of the button (if visible) and its tooltip.command– the command to be executed once the button is activated. This is the command we created in the previous step.toolbar– the toolbar group into which the button will be added.
Please note that you can influence the position of the button in the toolbar group by providing an optional index, for example:
// This could position the button at the beginning of the "insert" group.
toolbar: 'insert,0'

// This could position the button at the end of the "insert" group.
toolbar: 'insert,100'
Note: The exact position depends on the indexes defined by other buttons available in your toolbar, so it may take some experimenting with index values to create a perfect button sequence within a group.
# Plugin Loading
It is now time to tell CKEditor to load our plugin. To do so we have to add its name to the
CKEDITOR.config.extraPlugins configuration option:
config.extraPlugins = 'timestamp';
Please note that since CKEditor 4.1 all editor plugins that create content should be integrated with Advanced Content Filter (ACF).
In this case the plugin only inserts content that is usually allowed in default editor installations (the <em> element), but if you want to customize it and insert elements that are not allowed by the configuration, you need to either set config.allowedContent = true; in order to disable content filtering or integrate your plugin with ACF. For more information, please refer to the official Advanced Content Filter integration guide.
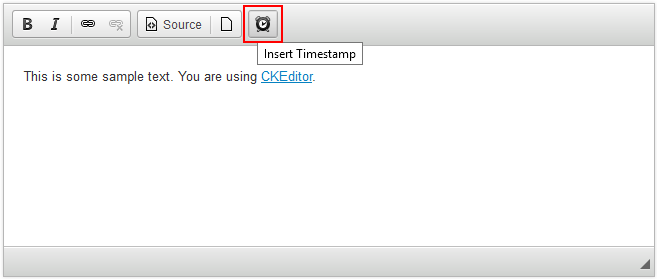
Now load a CKEditor sample page. You should be able to see the new plugin button in the toolbar. For example:
# Full Source Code
The complete content of the plugin.js file looks as follows:
CKEDITOR.plugins.add( 'timestamp', {
    icons: 'timestamp',
    init: function( editor ) {
        editor.addCommand( 'insertTimestamp', {
            exec: function( editor ) {
                var now = new Date();
                editor.insertHtml( 'The current date and time is: <em>' + now.toString() + '</em>' );
            }
        });
        editor.ui.addButton( 'Timestamp', {
            label: 'Insert Timestamp',
            command: 'insertTimestamp',
            toolbar: 'insert'
        });
    }
});
You can also download the entire plugin folder including the icon and the fully commented source code.
# Working Example
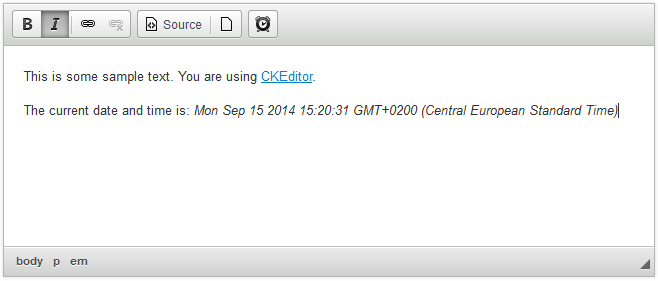
The plugin code is now ready. When you click the Insert Timestamp toolbar button,
current date and time will be inserted into the document.
Note that the timestamp format may vary for different platforms and browsers.
If you want to have more control over the display of the date and time, use the
Date object’s
properties and methods.
Congratulations! You have just created a valid CKEditor plugin in under 20 lines
of code! Since the editor.insertHtml method can be used to add arbitrary HTML code to
the document, you can replace the timestamp logic with your own customized code in
order to insert other types of content into your document.
# Timestamp Plugin Demo
See the working “Timestamp (Creating a Most Basic CKEditor Plugin)” sample that shows the Timestamp plugin integrated with an editor instance.
# Further Reading
Refer to the following resources for more information about creating CKEditor plugins:
- Simple Plugin, Part 1 – Develop a basic Abbreviation plugin with a dialog window that lets the user insert a an abbreviation element into the document.
- Simple Plugin, Part 2 – Modify the Abbreviation plugin by adding a custom context menu and abbreviation editing capabilities.
- Integrating Plugins with Advanced Content Filter – Learn how to implement Advanced Content Filter support in your plugins.
- Plugin Stylesheets – Tips on how to integrate custom plugin stylesheets with CKEditor.